
| Basic Specifications | |
|---|---|
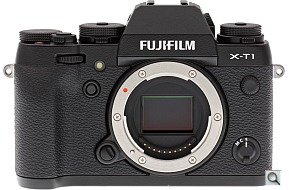
| Full model name: | Fujifilm X-T1 |
| Resolution: | 16.30 Megapixels |
| Sensor size: | APS-C |
| Kit Lens: | 3.06x zoom 18-55mm (27-84mm eq.) |
| Viewfinder: | EVF / LCD |
| ISO: | 100-51200 |
| Shutter: | 30-1/4000 |
| Max Aperture: | 2.8 |
| Dimensions: | 5.1 x 3.5 x 1.8 in. (129 x 90 x 47 mm) |
| Weight: | 27.2 oz (771 g) includes batteries, kit lens |
| MSRP: | $1,700 |
| Availability: | 02/2014 |
| Manufacturer: | Fujifilm |
| Full specs: | Fujifilm X-T1 specifications |
| 16.30 Megapixels |
Fujifilm X-Mount | APS-C size sensor |
|---|---|---|
 |
||
X-T1 Summary
The Fuji X-T1 is a great example of the retro genre. Don't let its surprisingly compact, vintage-styled body fool you, though: It's wrapped around cutting-edge technology, including a class-leading electronic viewfinder and Fuji's exclusive X-Trans sensor technology. The Fuji X-T1 also boasts blazing-fast performance and top-notch image quality, but is it the right camera for you? We roamed the continents in search of our answer. Read our in-depth Fuji X-T1 review, and find out if it's finally time to shelve your DSLR and join the mirrorless crowd!
ProsExcellent image quality; Solid, weather-sealed body; Retro design that actually makes sense in a digital camera; Very low viewfinder lag for single-servo shooting; Fast burst shooting with great buffer depths; In-camera Wi-Fi connectivity
ConsExposure compensation dial is easily bumped; Four-way controller buttons are hard to press; Significant viewfinder lag for burst shooting; No raw files above ISO 6,400; Default settings strongly limit JPEG dynamic range
Price and availabilityAvailable since February 2014, the Fujifilm X-T1 is priced at around US$1,300 body-only. A kit version bundling a non-weather sealed 18-55mm XF lens debuted at the same time, priced at around US$1,700. A variety of new accessories are also available, including a weather-sealed vertical battery grip with duplicate controls for portrait-orientation shooting, three hand grips of different sizes, a grip strap, an all-leather case, and more.
Imaging Resource rating4.0 out of 5.0


Fuji X-T1 Review -- Now Shooting
by Mike Tomkins
Posted 01/27/2014
Updates:
04/01/2014: Shooter's Report Blog Part I: Bright lights, big city!
05/08/2014: Image Quality Comparison and Print Quality
05/15/2014: Shooter's Report Blog Part II: When the sun goes down...
06/17/2014: Shooter's Report Blog Part III: Of hot rods and blimps
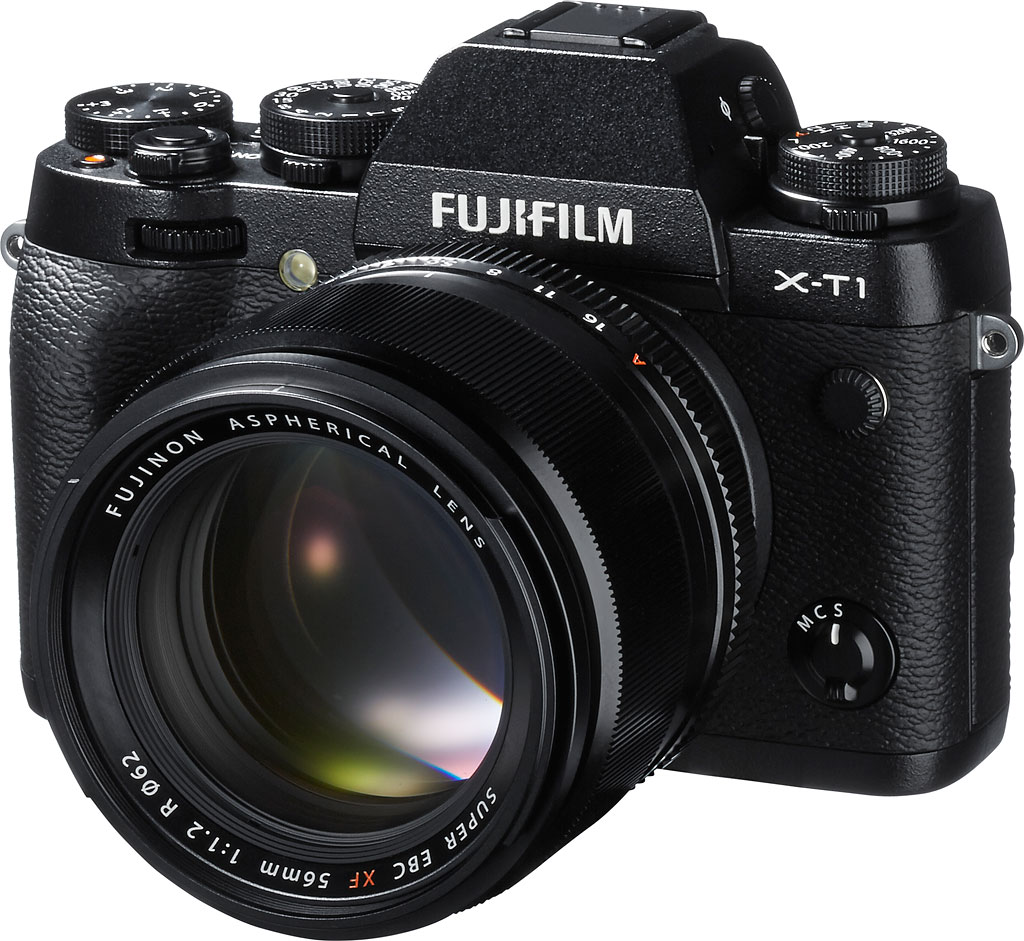
If you've been holding off on buying a Fujifilm X-series mirrorless camera because you weren't a fan of the rangefinder-like form factor, it may be time to reevaluate your decision. The 16.3-megapixel Fuji X-T1 compact system camera takes the X-series in a brand-new direction, ergonomically speaking, with a design aimed at SLR shooters who've not yet made the jump to mirrorless.
Until the Fuji X-T1, whether they've been based around a hybrid viewfinder, an electronic viewfinder, or no viewfinder at all, Fuji's X-series cameras have all shared a fairly similar, street shooter-friendly form factor and ergonomics. The Fuji T1 takes a different tack, aiming to bring SLR fans into the mirrorless fold with styling that makes them feel more at home -- right down to the pentaprism-esque hump on the top deck.
Look inside the X-T1, though, and you won't find a pentaprism. This is a mirrorless camera through and through; your framing will be done either on the LCD monitor, or on the built-in electronic viewfinder. And oh, what an EVF it is!
Fujifilm clearly recognized that if it wanted to make converts of SLR owners, it needed to provide a compelling argument for the death of the optical viewfinder. Sitting nearer the horizontal center of the body than in the company's rangefinder-like X-series models, the Fuji X-T1's newly-developed, Organic LED-based finder provides both the highest-magnification and the shortest update lag of any compact system camera before it, according to Fujifilm.
As well as the viewfinder, the Fuji X-T1's magnesium body plays host to a profusion of external, manual controls that will doubtless draw comparisons to the Nikon Df, a full-frame digital SLR with a similarly retro aesthetic. And like that camera -- but unlike all of its X-series mirrorless brethren -- the Fuji T1 is fully weather-sealed. It's also freeze and dust-resistant.
At the heart of the Fujifilm X-T1, right behind its X-mount, sits much the same 16.3-megapixel, X-Trans image sensor complete with on-chip phase detection autofocus pixels seen previously in the Fuji X-E2. That yields the same incredibly swift autofocus response time -- Fujifilm claims around 0.08-seconds, and our in-house testing was in the region of 0.14-0.15 seconds -- but the ISO sensitivity range is even greater than before, thanks to refined circuitry. The X-T1 is capable of shooting at sensitivities from ISO 100 to 51,200 equivalents. It's not just AF that's fast, either: The X-T1 is able to shoot at just slightly more than a whopping eight frames per second.
The Fuji T1 is also the first compact system camera that's compatible with UHS-II flash cards, which are even faster than their UHS-I SD predecessors. And Fujifilm has worked on its Wi-Fi connectivity, improving it with support for remote shooting and the ability to adjust most settings remotely as well.
In many respects, the Fuji X-T1 could be seen as a new flagship for the X-series. As you can see, it sports many new features not seen in an X-series camera before now. Fujifilm tells us that X-Pro1 continues as flagship of the line, though, even if in some ways it's bested by the young upstart. The X-T1, we're told, slots into Fuji's lineup directly above the X-E2.
Without any further ado, let's take a look around the Fuji X-T1's brand-new body.
Walkaround. As mentioned, the Fujifilm X-T1's body is comprehensively sealed for water and dust resistance, and is also freeze-proof to -14°F. Constructed from die-cast magnesium and aluminum alloy, the body includes a total of some 75 weather seals throughout. The top deck is covered by an array of dials, two of them double-decked, and CNC-milled from aluminum. On the rear, the LCD monitor is overlaid by a tempered glass panel for added protection.

Seen from the front, controls include a dial tucked into the top of the hand grip, as well as a programmable function button -- one of six found on the body -- plus the lens-mount release button and focus mode selector switch.
There's also an autofocus assist lamp adjacent to the top of the handgrip, and directly across the top of the lens mount, a flash sync terminal.
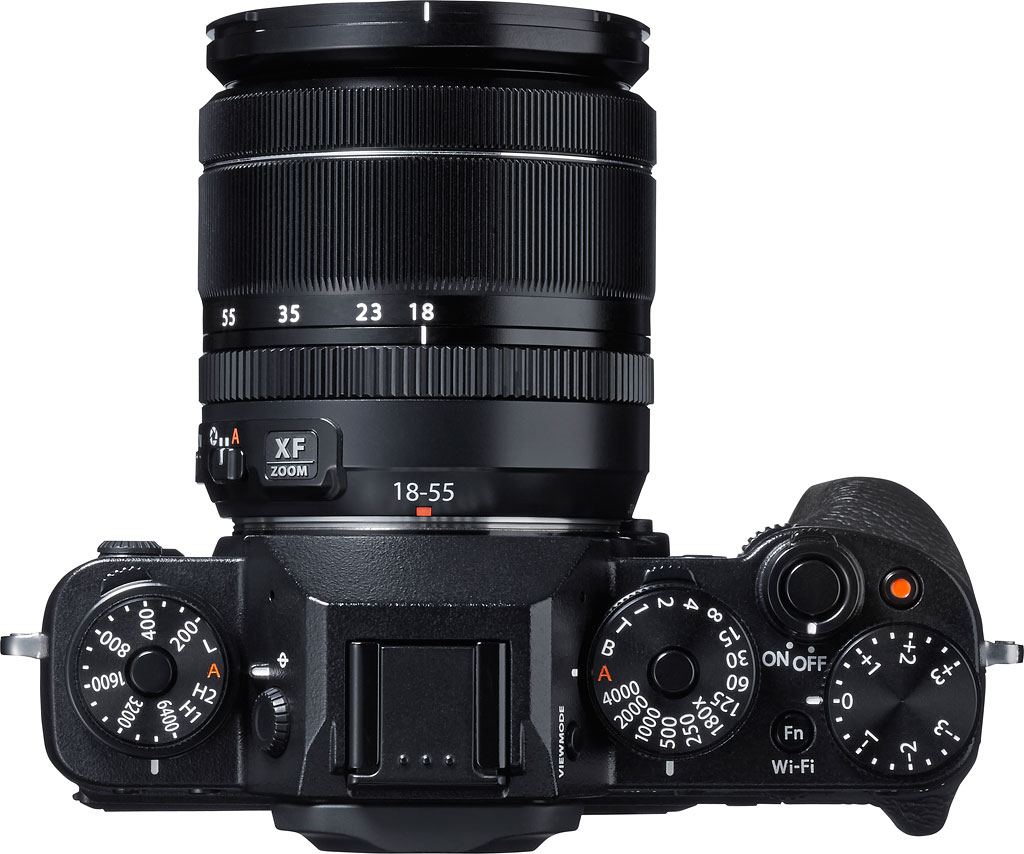
Moving to the top deck, we get a better look at all those many dials, which make it quick and easy to confirm the camera's setup without needing to resort to a power-hungry LCD monitor.
On the left shoulder sits an ISO sensitivity dial, above a drive mode dial which we'll see better from the rear of the camera, momentarily. Note that as well as positions from ISO 200 to 6400 equivalents, plus L (100), H1 (12,800), and H2 (25,600) positions, an A (Auto) position lets the camera take control of this variable.
Moving right a little, there's a diopter correction dial on the left flank of the viewfinder housing, and at its top sits a flash hot shoe. The other side of the viewfinder housing is home to a viewfinder button, used to switch between the electronic viewfinder and LCD monitor. Viewfinder switching can also be accomplished automatically, as we'll see in a moment.
Finally, the right shoulder of the Fuji X-T1 is jam-packed with controls. Starting just right of the viewfinder hump, we have the shutter speed control, offering everything from 1/4,000 to one second plus Time, Bulb, and Auto. (There's also a specific marking for the 1/180 second flash sync speed.) This dial sits wedding-cake style above a metering mode dial, and just to its right are a function button and a +/-3.0 EV exposure compensation dial with fixed 1/3 EV steps.
In front of the exposure compensation dial is a movie record button, and just left of that is the shutter button encircled by an on/off switch.
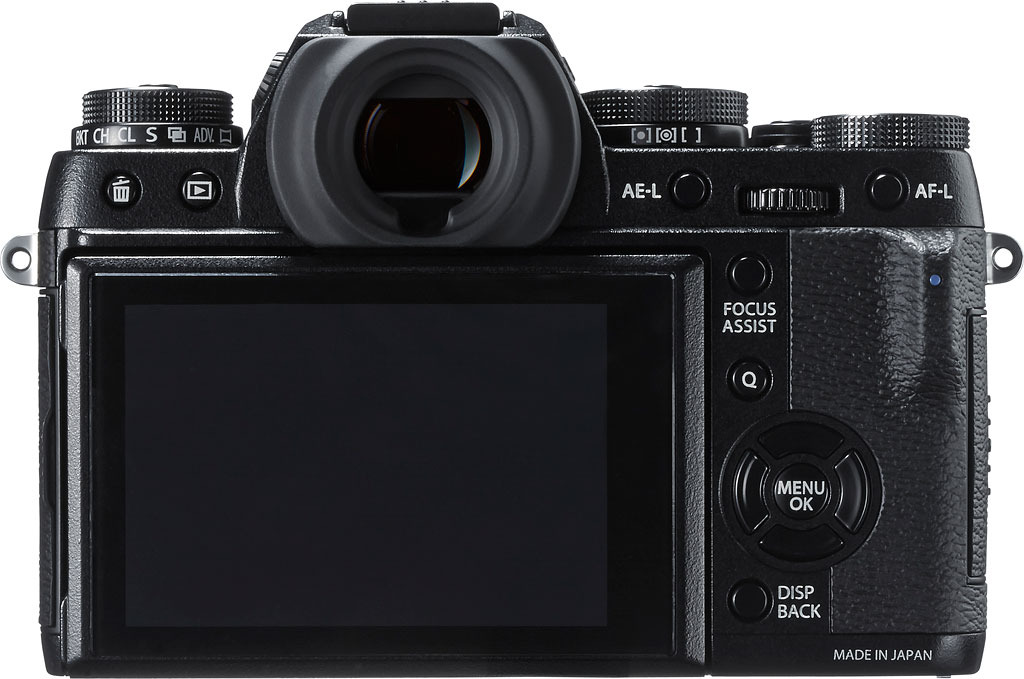
From the rear, first of all note the drive mode and metering mode dials, mentioned previously and sitting beneath other top-deck dials.
Moving down onto the rear of the camera proper, and starting at left above the LCD, we have the delete and playback buttons just left of the viewfinder, as well as the auto-exposure lock button to its right. There's then a second control dial, and the autofocus lock button sits at very top right.
Lining the rightmost side of the LCD monitor are the focus assist and quick menu buttons, the four-way control pad with central menu / OK button, and the display / back button.
There's also a nicely protruding thumbgrip at top right, helping to give a solid purchase on the camera when shooting single-handed.
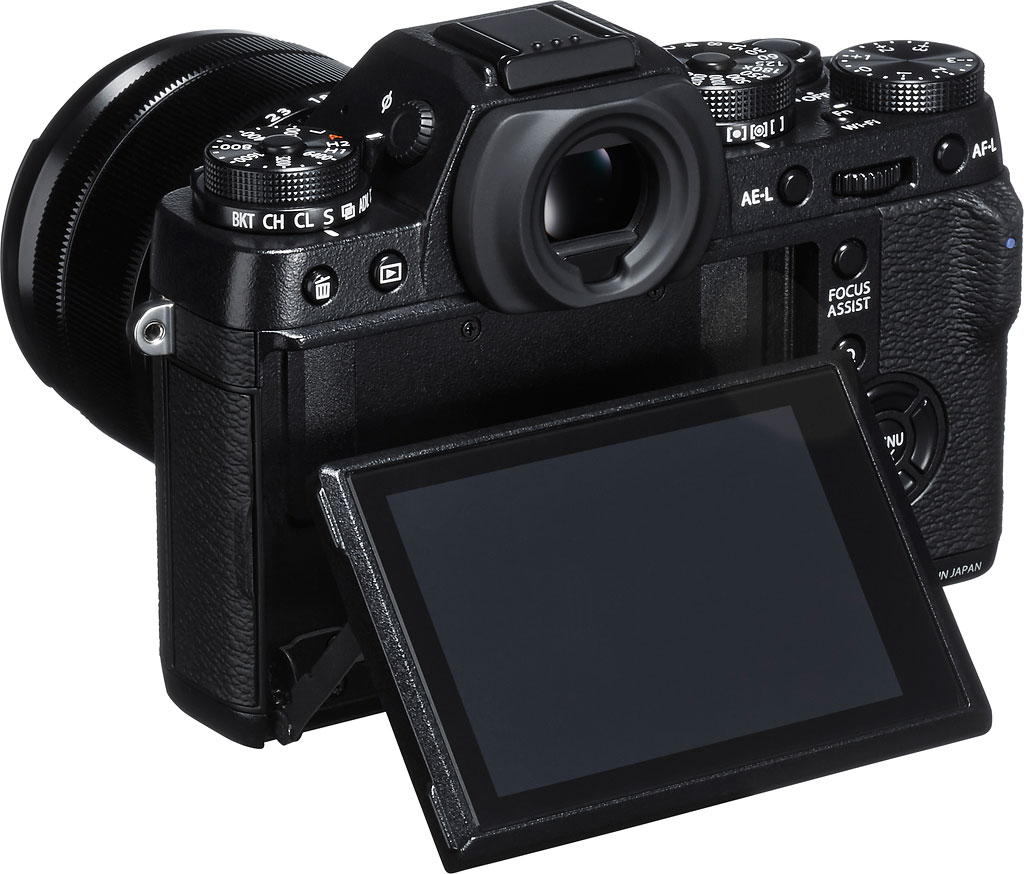
There's not a whole lot to see at left which we haven't already covered, but this shot nicely shows off the tilting LCD monitor, which can face upwards or downwards, but can't be seen from in front of the camera for self-portraits.
You can also better see the diopter correction dial on the left of the viewfinder hump, and the access panel for the connectivity compartment lines the left side of the camera body.
Place your order with a trusted Imaging Resource affiliate now:
Shooting with the Fuji X-T1
By Mike Tomkins
Part I -- Bright lights, big city
Posted: 03/31/2014
When it was time for an overseas trip, the Fuji X-T1's trim body seemed like the ideal companion.
As a fan of retro ergonomics, I've been interested in the Fuji X-T1 ever since it was announced at the start of the year. It wasn't until a two-week vacation in my one-time home of Hong Kong came near, though, that I had the perfect excuse to get my hands on what's proven to be a pretty popular camera ever since it arrived at Imaging Resource headquarters. When the trip loomed large and I inquired as to which cameras might be available to take with me, the X-T1 seemed to be the obvious choice. Not only was it a nice match for my shooting style, but it was also pretty compact, and for this trip I would be packing light.
To accompany the X-T1 body, I selected three lenses: the Fujinon XF18-55mmF2.8-4 R LM OIS and Fujinon XF55-200mmF3.5-4.8 R LM OIS zooms, as well as the Fujinon XF35mmF1.4 R prime. The two zooms touched the bases for a broad coverage from wide-angle to telephoto, while the prime seemed ideal as a walkaround, street shooter lens. (Truth be told, I wasn't expecting to need the longer focal lengths of the 55-200mm lens too much. Hong Kong being a densely-populated city, getting far enough from your subject is usually harder than framing up close. Still, it seemed worth taking nonetheless, if only for shooting around the harbor.) I also brought the VG-XT1 vertical battery grip with a spare battery, which never left the camera, as well as the tiny, bundled EF-X8 flash strobe which it turned out I never needed to use.
The savings in weight over a similarly-specified enthusiast DSLR kit -- a Pentax K-3, battery grip, and similar lenses -- is actually only very slight. The Fujifilm gear comes to about 3.9 pounds all-in, where the equivalent Pentax kit would be just a touch under 4.1 pounds. However, Fuji's lenses are all somewhat brighter than their nearest Pentax equivalents, despite a very noticeable savings in size. And honestly, it's size more than weight that matters when I'm packing for overseas travel. I'm not letting my camera gear be put in the hold -- my family worked in the airline industry, and I know what happens to checked bags (!!) -- but space is at a premium in a carry-on bag. Especially one that can fit in the little regional jets that frequent my local airport.
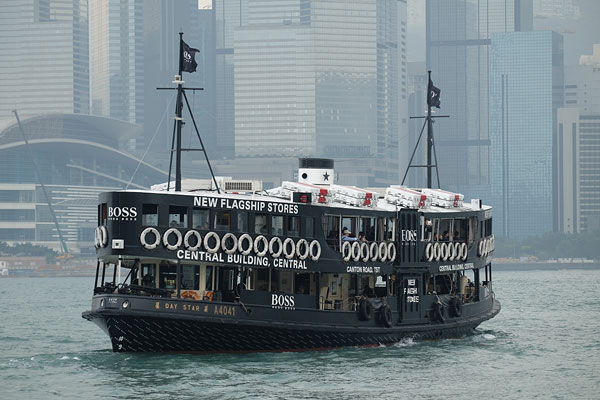 |
With Hong Kong being densely packed and somewhat hazy at this time of year, I expected to get more use out of my 18-55 zoom and 35mm prime than out of the 55-200mm zoom -- and I was right. Still, I got some very nice shots out of the latter, such as this Hugo Boss-wrapped Star Ferry. |
I had a few days to familiarize myself with the X-T1 before leaving for Hong Kong, but it wasn't until I arrived that I had time to really shoot in earnest. Thankfully, I found the little Fuji to be very approachable and quick to come to terms with. Having all those clearly-marked external controls makes for an intuitive experience. And since each control also has an Auto position, there's no need for a Mode dial. The result is much more coherent than another retro shooter I'd recently taken for a spin, the Nikon Df. (And despite being a much smaller camera, the X-T1 somehow feels less cramped than the Df did, as well.) It took me a little while to remember that, with no Mode dial, features like panorama shooting and multiple exposure belonged on the Drive mode dial, but once I got used to that I really fell in love with the X-T1's layout.
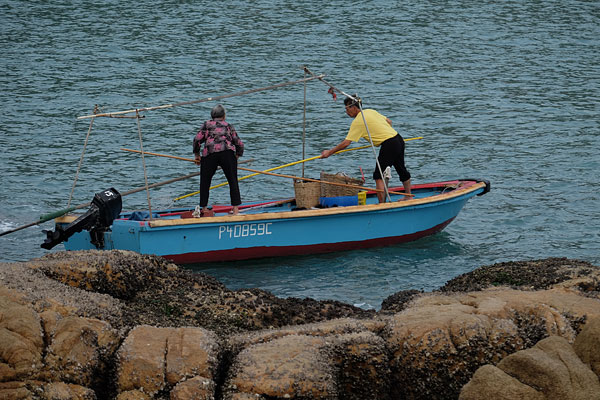 |
The 55-200mm lens also did a nice job with these sea urchin fishermen. You can easily make out the individual, razor-sharp spines of their freshly-gathered catch, emptied from traps just moments before. |
There is a slight dichotomy in the lenses, though. The two zooms have fly-by-wire aperture rings and a separate auto / manual aperture switch, where the 35mm prime has a proper, manual aperture ring complete with an "A" position for automatic aperture control. I much prefer the manual ring, which gels better with the overall experience of the X-T1, but honestly I could live with either approach by itself. I find it a bit confusing switching back and forth between the two depending on which lens is in use, however. Were I to buy the X-T1, I'd probably factor the aperture control method into my decision when choosing which lenses to buy, for a more cohesive experience.

By default, the Fuji X-T1's colors are quite realistic, but a bit muted. This temple roof in the fishing town of Sai Kung is a bit richer in real life. Adding about +10 vibrance and +10 saturation in Photoshop yields a result closer to my memory.
Despite a shallower grip than I typically prefer, I find the Fuji X-T1 very comfortable in-hand, and nicely balanced as well. Especially so with the portrait grip attached -- I left this on all the time, and not just for its extra battery, but also for its duplicate portrait-orientation controls. It took quite a while before I could remember to use them, though. Perhaps because the combination of body and grip is still so (relatively) compact, I kept forgetting there was another shutter button, and reaching across the top of the camera to the main button even for portraits. And even now I've gotten used to it, I still sometimes stick to the main shutter button simply because I find its locking switch to be a little bit fiddly.
There's also a slight quirk with the grip's operation with respect to the second battery. The camera will power-cycle itself after you first switch it on if the battery in the grip is flat, and continues to randomly do so every now and then before or after a shot, if you leave the drained cell in the grip. I did, just one time, miss a shot due to this quirk, but it's easy enough to remove the drained battery and slip it in a pocket. I'm hopeful this is something that can be addressed with a firmware update, too.
I also found occasional issues with the camera not waking back up after it had gone to sleep, even if I fully depressed the shutter button. I've yet to figure out a pattern to this -- perhaps there's a certain time duration that has to elapse to trigger the problem -- but power-cycling the camera always brought it straight back to life. And battery life seems reasonable. Only twice during my fortnight in Hong Kong did I shoot enough to drain the entire battery in a single day, and I never came close to draining both batteries in a day's shooting. (But then, I did religiously charge both cells each night.)
Although I've yet to shoot any particularly active subjects, autofocus performance so far seems pretty good, with one exception. Beyond about 135mm, the 55-200mm is a bit on the slow side, autofocus-wise. Even when presented with a high-contrast subject that's already in focus, it will rack all the way from the nearest focus distance to the actual focus distance, taking as much as a second to do so. (Other lenses, and the 55-200mm at nearer focal lengths, show the same focus-racking behavior, but they arrive at the point of focus quickly enough that it doesn't feel like an issue.) I was initially frustrated by the need to dive into the menu to change between multi-point and single-point AF modes, but as soon as I found that I could assign this to the front function button, I was happy once more.
Plenty of detail in this old sampan, shot with DR400 (400% Dynamic Range) to open up the shadows without blowing the bright but slightly hazy, overcast sky. The default exposure would've been perfect, but unfortunately the exposure compensation dial got bumped, leaving me with a choice of slightly underexposed or overexposed shots from my +/-2/3EV bracketed triplet.
There are a couple of controls on the X-T1's body that I'm not entirely happy with. The rear four-way controller's buttons are very small and don't have a great button-feel when pressed, so they're not the best to operate solely by touch. And after spending a little while shooting with exposure compensation dialed in by accident, I realized that you really have to pay attention to this control. It's simply too easily turned, and needs either a locking button or a stronger click detent. After that first problem, I checked almost every time I went to take a shot, and noticed just in time that the dial had changed on several other occasions. (Typically, when the camera had been in a bag, but I also noticed it changing a couple of times after I'd been wearing it around my neck on bumpy minibus rides.)
I'm a big fan of optical viewfinders, and have yet to find an electronic viewfinder that has persuaded me to convert. The Fuji X-T1's viewfinder is the closest yet, though. There are a couple of things I very much like about it. For one thing, it's very roomy. I'm also starting to realize that one of my key complaints with electronic viewfinders is the lag between the real world, and what my eye sees. It might be barely perceptible on most cameras, but it's still a disconnect from my subject. The X-T1's viewfinder is much faster than most -- and for that reason it feels more natural to me.
It could stand to be a bit brighter, but I only really had difficulty with it under harsh sunlight, and even then mostly because of its viewfinder eyepiece, which has a very shallow cup. Shielding the top or side of the camera with my free hand does the trick, but if I were to buy this camera, I'd probably take a trip to my local camera store to see if I could find a more generous viewfinder eyecup that fit. (Fuji doesn't make one, and although I tried eyecups from Canon, Pentax and Sony, none of them fit either.) I also noticed its eye sensor has a range of several inches, which is enough that when holding the camera in my right hand with a heavier lens attached and using my left hand to fiddle around in menus, causes the screen to randomly turn off and on. The solution's pretty simple -- don't use my left hand to reach across the camera.
The menu system is pretty straightforward, if a bit plain. (But then I must admit I tend to prefer plain over showy when it comes to menus.) There are a few places it could use better organization -- I'm not entirely sure why there are two separate sections on far-distant tabs of the menu related to Wi-Fi connectivity, for example -- but it's probably as good as (or better than) most in this respect.
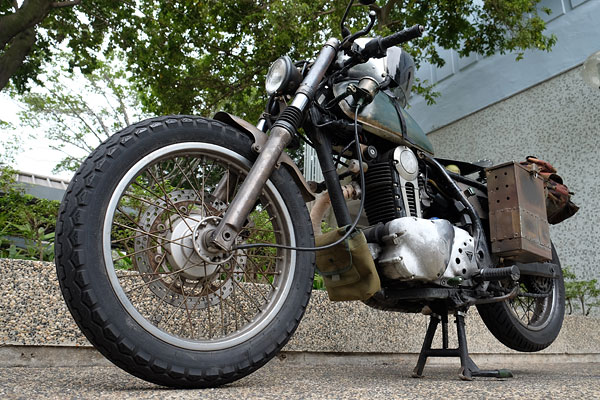 |
The only way to isolate this old motorcycle from a rather distracting background was to shoot from ankle-height. The Fuji X-T1's handy, tilting LCD monitor helped me get really, really low. |
Speaking of Wi-Fi, I found myself using this a lot more than I do with most cameras. That's perhaps in part because I was on a trip home, and many of my Facebook friends wanted to see the pictures too. Still, it's also because once set up, it's a pretty painless process: just press the top-deck Wi-Fi button, open the Photo Receiver app on my phone, and wait ten or fifteen seconds before choosing a few photos to transfer. The only real annoyance is that I tend to leave Wi-Fi disabled on my phone to save on battery life, but Fuji's app (for Android, at least) leaves the Wi-Fi connection active when it's finished with it, rather than returning it to its original state. That caused a flat phone battery once, when I wasn't aware of the behavior -- but I quickly learned to disable Wi-Fi manually whenever I was done. I've not used the more complex Camera Remote app (which allows remote control and geotagging) very much yet, so expect more on that in a later Shooter's Report.
 |
The Fuji X-T1 occasionally struggled with the complex mixture of light sources on offer in Hong Kong. It's easily fixed, though -- Photoshop's Auto Color tool corrects the excessive warmth nicely. Add a touch of saturation/vibrance, and this shot in Choi Hung's wet market matches my memory nicely. |
While I was in Hong Kong, I didn't have much opportunity to assess image quality, as my laptop screen -- while bright -- is not the best in terms of color rendition. Now that I'm back in the office, I've taken a look on my calibrated Dell UltraSharp U2410 monitor, though, and I like what I see from out-of-camera JPEGs. (I've not yet had a chance to try fiddling with raw files from the X-T1.) Colors are accurate and very much as I remember them, if perhaps just a little muted. White balance can tend to struggle a bit with Hong Kong's wildly-varying light sources, though, occasionally rendering night scenes either warm, or with a somewhat sickly green cast. Exposures were likewise pretty accurate. Sharpness seems fairly good as well, considering that the sensor resolution does lag what's available from APS-C rivals these days.
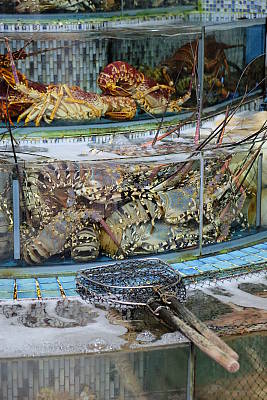
Now, this shot the X-T1 really nailed. The colors and detail in these colossal lobsters in a Sai Kung fish market are exactly as I remember them.
Another feature of the X-T1 that I found myself playing with quite a bit is it's panorama feature, Hong Kong being a place which lends itself to a good pano. It's pretty straightforward to use, and interesting in that it provides a choice not just of how wide the pano should be, but also of which direction it should run in. It doesn't handle moving subjects very gracefully, though, and when presented with Hong Kong's twinkling lights at night, had a tendency to produce some fairly heavy banding in the sky as lights pulsed on and off between frames. Still, presented with a more static subject it yielded some pretty nice results, and after a dozen or so tries, I got one handheld panorama of the Hong Kong harbor at dusk that I'll likely put on my wall, after a little tweaking.
One last feature that's an absolute delight is the Fuji X-T1's playback mode, which allows you to review images while they're still being written to the Secure Digital card. Initially, we'd understood that feature to be reliant on using the swifter UHS-II Secure Digital cards, which feature a second row of contacts for increased bandwidth. Although I've not done a lot of burst-shooting yet, I've tried a few lengthy bursts of images both on UHS-II and UHS-I cards, and the speed with which you can start reviewing images on either is seriously impressive. After a burst of a couple of dozen images in raw+JPEG format, there's a delay of just a few seconds until you can start reviewing those images, unlike most cameras which make you wait until the entire burst has finished writing to storage. That one change makes the camera feel much more responsive -- and you don't even have to shell out for a UHS-II card to get it! Very cool indeed.
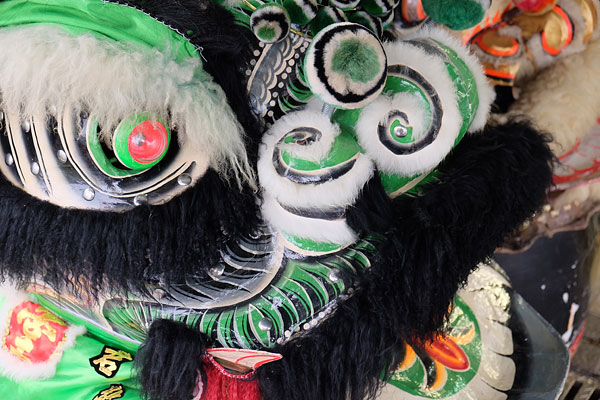 |
This lion dancer's mask, believe it or not, is even richer and more colorful in person. A little boost in saturation from the default easily fixes that, though, and the default colors do seem quite accurate. |
Part II -- When the sun goes down...
Posted: 05/15/2014
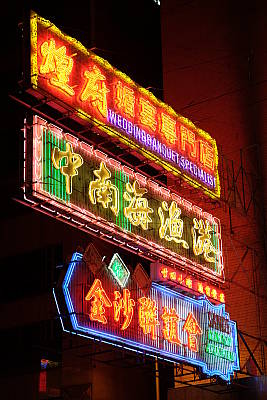
Neon signs like these, a fast-disappearing part of Hong Kong's heritage, are hard to capture in a photo. They're extremely vivid, and clip very easily.
As you'll have seen in the first part of my Shooter's Report, I was having plenty of fun shooting with the Fuji X-T1 in the daytime. (Missed it? Catch up here.) But how would this deliciously retro body handle itself in more difficult conditions? I wanted to get a feel for it both in lower light, and with Hong Kong's famous city lights.
My first introduction to low-light shooting with the X-T1, though, was something of an accident. Shortly before my trip, a sizeable Vietnamese cargo ship called the Sunrise Orient was wrecked on the island of Cheung Chau after its crew, fearing an imminent capsizing, abandoned ship with the engines still running. It struck me as a pretty unusual photo opportunity, and I set off in search of the wreck with an idea of what I wanted to shoot, but with no knowledge of precisely where the unmanned ship had eventually beached itself.
My intention was to get close to its bow, and shoot a bunch of low-to-the-ground, wide-angle exposures to emphasize the ship's size. Each would be tripod-mounted, shot at low sensitivity and with a narrow aperture to get a longer exposure time, and then I'd stack them to blur out the waves even more. (I didn't see it until after my return from Hong Kong, but this awesome shot by local photographer Joe Chen is very close to what I'd been planning.)
I knew the Sunrise Orient was stranded somewhere on the eastern coast of Cheung Chau, and at three in the afternoon, chose to start my search from what seemed a promising location on the southeast corner of the island that seemed (from a look at Google Earth) to match the shape of the bay as I'd seen it in others' photos of the wreck. As it turned out, I'd chosen the wrong end of the island though, and by the time I first spotted the wreck three hours later -- with the help of a friendly local photographer who guessed what I was searching for and set me on my way -- I was already down to the dying minutes of the day.
Worse still, I had only my partially-charged cellphone's LED flashlight to guide me home on an unlit, rough and unfamiliar trail, having not been expecting to be out til sunset, let alone after it. After twenty minutes more walking, I realized that there was no chance of my even arriving at the wreck before dark, and diverted to a different path that would at least get me within a quarter mile. And finally, 15 minutes after sunset, I set up my tripod at a small pagoda near Coral Beach (Tung Wan Tsai), with darkness quickly falling. I had time for just two attempts at the long exposure shot I was hoping for, and from a lot farther away than I'd intended, as well. (Thankfully, I had Fuji's 55-200mm zoom with me, or it'd have been an entirely lost cause.)
 |
Initially, I'd planned to shoot the Sunrise Orient shipwreck toward the bow at wide angle, and low to the ground. Sadly, I didn't find it in time to get there before dark, and had to settle for a telephoto shot from the rear. The long exposure that blurs out the waves isn't so noticeable or dramatic from this angle. I've corrected the brightness post-capture; the original shot is in the gallery. |
Eyeballing the exposure at around 30 seconds and f/22, I was at least in the ballpark, but had failed to account for how quickly the light was disappearing. Before correction, the shot appears rather underexposed. My second attempt was a 45-second exposure at the same aperture, but within the space of just one minute, the light had dimmed enough that it was even darker despite the much longer exposure. And that was it -- my time was up, and if I didn't leave immediately I wasn't going to be able to find my way safely back to civilization.
The original shot is in the gallery, and above is one corrected simply with a click of the Auto Contrast control in Photoshop, bringing it back to the look of daytime. Even if it's not remotely what I was going for -- the blurred sea doesn't really work from this angle, and the ship's framing isn't very dramatic -- I think it's still a neat shot. But oh, what could have been, had I gotten there earlier or brought a flashlight -- as did one of the photographers who didn't get lost, visible in the background of my shot near the wreck.
By the time I got back to the ferry pier, it was completely dark. I rather liked the juxtaposition of a huge, gas-guzzling ferry against Cheung Chau's many eco-friendly bicycles in the foreground, and grabbed another shot, which you can see in the gallery. It was taken in very difficult lighting, though -- a predominantly white ship, and lots of white / silver on the bicycles in the foreground too, but with each under totally different light sources. Ricoh's Multi-Pattern Auto White Balance would probably have come in handy here, as Fuji's auto white balance left the bikes extremely warm. (Although saying that, I actually fiddled with the original raw file in Lightroom to improve the white balance on the bikes without changing that of the ship, and found myself preferring the original shot anyway, so perhaps the camera's choice was for the best.)
 |
Difficult lighting, but I think the X-T1, with its 18-55mm f/2.8-4 lens mounted, handled it pretty well. |
Eager to rest my legs after what had proven to be a rather difficult and strenuous day, I headed for supper and my hotel. I grabbed one last shot that I rather liked on the way, again in very difficult conditions. Love it or hate it, the rather divisive 1881 Heritage mall in Tsim Sha Tsui -- which couples a restored, historic Marine Police headquarters with a faux-historic shopping mall -- is undeniably photogenic. It's also permanently packed with photographers and a mass of tourists grabbing photo opportunities in the courtyard. As I walked past, a display with gigantic, fake flowers as its centerpiece was attracting quite some attention. Despite all sorts of light sources, many of them glaring right at the lens, the X-T1 did a pretty good job braced against a handy pillar, and set to ISO 1250.
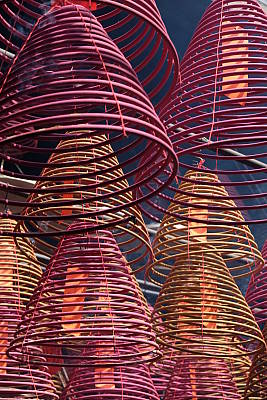
In real life, the colors of these incense coils in Yau Ma Tei's Tin Hau Temple are quite a bit more vivid. A quick tweak in Photoshop brings them right back to life, though.
The following day, I visited the Tin Hau Temple in Yau Ma Tei, which is devoted to the goddess Ma Zou, protector of fisherman. Although doing my best to remain quiet and respectful, I took quite a few pictures there. I particularly loved this shot of incense coils burning in the ceiling, even if they're much more vivid in real life than the shot makes them seem. A bump of vibrance and saturation restores their color. The lighting isn't actually as low as it seems -- quite a bit of sunlight filters into the temple, so the camera needed only a 1/160 second exposure at f/5.6 and ISO 200.
It wasn't until a couple of nights later that I got back to some real night shooting, this time at the harbor front before the nightly Symphony of Lights laser show. I wanted to get a nice panorama of the harbor, and so I spent a while playing with the Fuji T1's built-in pano function.
As you'll see below, I managed to get a panorama I'm pretty happy with, although I prefer it after tweaking to combat the haze a bit. (Of course, the haze isn't the camera's fault; you'll see the untouched original in the gallery.)
It did take quite a bit of work to get this result, though, for two reasons. Firstly, since the panorama length is predetermined -- you can opt for a shorter or longer panorama, but can't simply sweep and then let go of the shutter button at your chosen length -- it's hard to tell where to start off, to end the panorama right where you want. Secondly, the X-T1 struggles badly with motion or change in exposure during a panorama. The signs blinking on and off on the opposite side of the harbor caused sudden changes in brightness between frames, and the boats passing in the foreground turned into a mess of jumbled slices.
After a bunch of attempts, though, I managed the panorama shown below:
 |
I still cut off the building at right, but I'm otherwise very happy with this panorama. This shot has been tweaked to reduce the haze in the sky; see the original in the gallery. |
I also got what's probably my favorite single shot of the whole trip, a tighter-framed shot of Central district from the Bank of China to The Center. I actually shot this scene as a set of three fairly closely-bracketed exposures, but later decided to merge them into a single shot using Unified Color's HDR Expose 3. I fiddled with the controls for a little while to get a bold, contrasty look which brought down the haze a bit, while leaving a trace of the ridge line behind the skyscrapers.
 |
This shot -- actually a stack of three separate frames, all of which are in the gallery -- will be going up on my wall. The vibrance of downtown Central is captured very nicely by the Fuji X-T1. |
As an added bonus, it also salvaged the lights which extended only part-way up the Bank of China building -- "the zig-zag skyscraper", as my five year old son calls it -- as it had been only partially-illuminated in the best-exposed single frame of the trio.I've printed this shot out and hung it over my desk as a reminder of home.
I rounded out my night's shooting with a couple of the fast-vanishing neon signs with which Hong Kong was once so very closely associated. (Sadly, they're becoming something of a rarity these days.) These are so vivid and strongly-saturated that they can present quite a challenge to photograph. They're just plain fun to shoot, though -- I was like a kid, playing with exposure and fiddling with zoom during exposures as I wandered around snapping photos. I was very pleased with the results I achieved with the X-T1 -- enough so that I've proudly added a couple of my shots to M+ Museum's online compendium of Hong Kong neon signs.
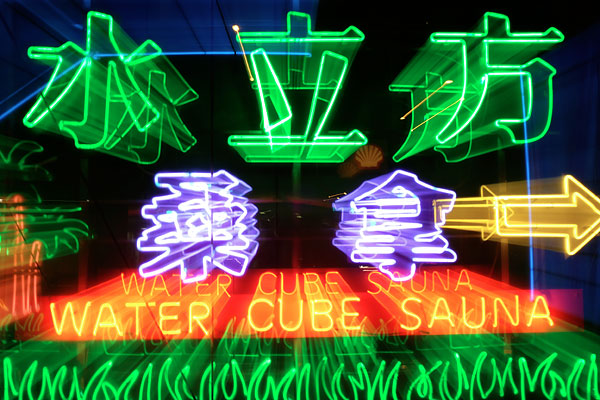 |
Now this was fun to shoot. I set the camera up for a two-second exposure, aimed at the sign, tripped the shutter while holding the camera as still as I could for a second, then zoomed all the way out. It resembles a one-point perspective drawing; I needed quite a few attempts to achieve the result I wanted. |
Done with night shooting for the time being, I returned to 1881 Heritage for some more photos in the daytime a couple of days later, after a brief stop by an idyllic urban park right near my hotel. (As a one-time local, I stayed in Mong Kok, away from the main tourist areas in an area that retains more of the charm of the Hong Kong I grew up with.) You'll see these and more in the gallery.
Through it all, I continued to appreciate traveling light with X-T1. My DSLR kit would've had me in serious pain by this point, as I hardly stopped walking the whole trip.
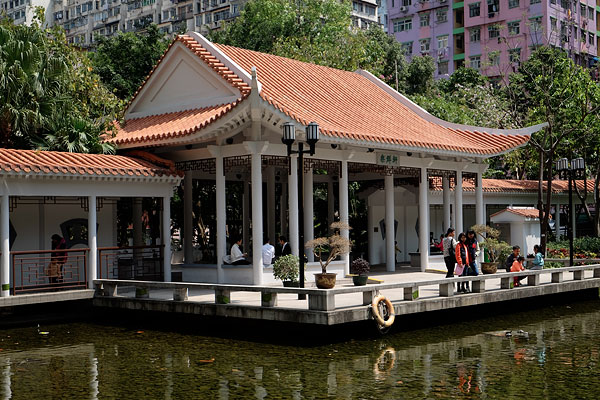 |
This idyllic park near my hotel was well worth stopping by. The X-T1 recorded it faithfully, and with lots of detail. Can you find the turtles hiding in the foreground? |
And when I was done, I headed back to the harbor for what promised to be a lovely sunset -- and didn't disappoint. You can already can see the warmth enveloping the harbor in the shot below, and shortly afterward, it turned into the most beautiful display of gradually-shifting colors across the whole sky.
 |
The Fuji X-T1's white balance system nicely held onto the warmth of this late golden hour shot. |
Only a pano could do it justice, and boy, did it ever. Again, it took a few tries to get the panorama to start and end just where I wanted, but once I managed that, I was very happy with the result. Using the camera's built-in Wi-Fi, I shared this shot immediately on Facebook for friends and family to see, and not surprisingly, it got plenty of comments and kudos.
In-camera Wi-Fi is very nice to have for that reason -- had I not shared it immediately, I'd probably have forgotten to share it at all. I was mildly frustrated, though, to discover that Facebook's Android app resizes panoramas to postage-stamp size on upload, so my friends missed out on most of the detail.
 |
Another nice in-camera pano from the Fuji X-T1 captured the last gasp of sunset very well. I shared this shot with friends and family by Wi-Fi right away. Here, I've tweaked curves and saturation in Photoshop; see the original shot in the gallery. |
One last night shot on the way home really impressed me. After walking down the waterfront along the Avenue of Stars -- a tourist attraction not unlike the Hollywood Walk of Fame that's a Who's Who of the Hong Kong movie industry -- I walked past the side of the egg-shaped Space Museum, and my eye was caught by the historic Peninsula Hotel, brightly-lit in front of me.
This 2.4-second exposure is nice and sharp, despite being shot without a tripod. The secret? A somewhat-flimsy temporary railing, and the 18-55mm lens' image stabilization system. Nice!
I wanted to capture it along with the motion of the buses whizzing past in front, but I hadn't planned to be out so late, so I'd left my tripod back at the hotel. I braced the camera against the only convenient object -- a slightly wobbly temporary railing -- and the 18-55mm lens' image stabilization system did the rest. Believe it or not, it netted me a nice, sharp shot after only a few attempts, despite a 2.4 second exposure!
Sadly, all good things must come to an end, and so to did my trip back home to Hong Kong. After a last couple of shots of early-morning sunlight, one of which you'll see in the gallery -- I rather liked the warmth of the sun against the buildings, and the bright, bat-shaped pawn shop sign in the foreground -- it was time to head to the airport.
The X-T1 was compact enough that I kept it out around my neck while lugging my carry-on bags around the airport, and that scored me two more photo opportunities that I'd otherwise have missed.
The first was a replica 1910 Farman biplane, hanging from the ceiling in the departure hall. The original it was based upon was the first aircraft ever to fly in Hong Kong, and this replica flew from the then-new Hong Kong International Airport in 1997, less than a year before its official opening.
I got quite a few shots of the Farman from various angles, and you can see my favorite in the gallery. The X-T1 picked up lots of detail in the wood grain, showing just how flimsy this craft really was. It must have taken a very brave soul to pilot it!
The other photo opportunity turned out to be my last shot of the trip -- my Cathay Pacific Airways Boeing 777, waiting for me to board. I shot it through thick, tinted glass, but you wouldn't know it to look at it.
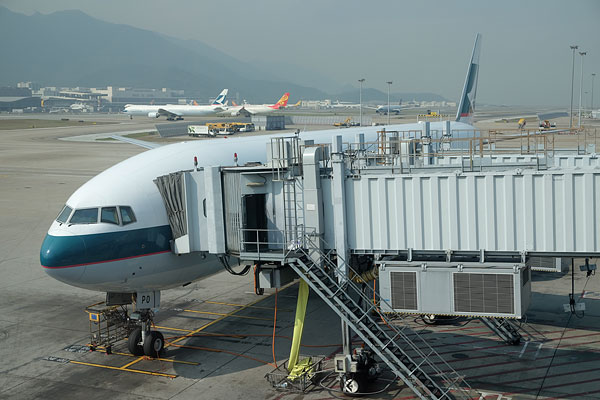 |
Shot through a thick, tinted plate glass window, but you wouldn't know it. There's plenty of detail, and color is good as well. And now, my flight awaits. For my final report, I'll be back home in Knoxville, TN! |
Part III -- Of hot rods and blimps...
Posted: 06/17/2014
During my two weeks in Hong Kong, I had plenty of opportunity to test out the Fuji X-T1 in all manner of shooting situations -- or at least, most of them. There wasn't much opportunity for shooting sports or active subjects, so I saved that for my return to Knoxville, TN.
And then my PC died, leaving me scrambling to repair it, and causing me to miss my planned sports shoot -- but fortunately there was a car show in town once I was done with the hassle of resurrecting Windows.
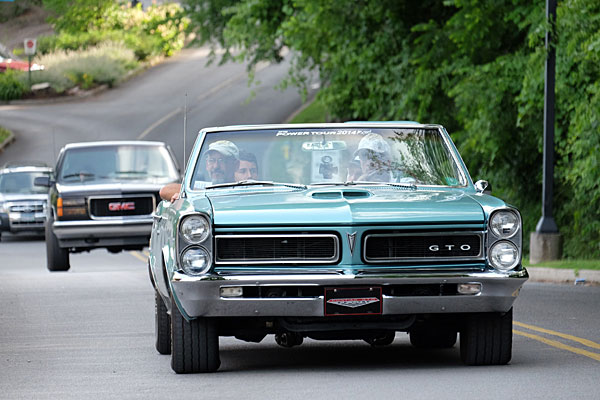
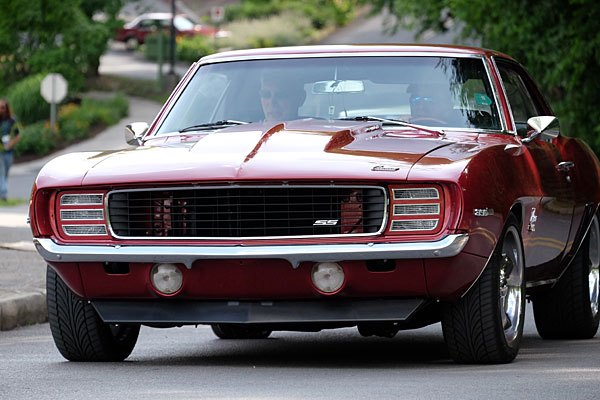 |
To test the X-T1's autofocus chops, I took it to a car show. The gorgeous retro body looked right at home in the company of vintage cars like this 1969 Chevrolet Camaro RS/SS 396! |
The Hot Rod Power Tour in Knoxville's Chilhowee Park promised lots of color and visual interest, but at first blush, not a lot of action. As it happened, though, I found a good spot from which to shoot near the exit to the car park as all the hot rods, classics, and not-quite-so-classics (including everything right down to the infamous Chevy Nova) were leaving for the day.
I settled in at end of a short straight on the outside corner of a turn, so that the cars were coming straight towards me, and shot with the 55-200mm lens to frame tightly.
From the time the cars took to traverse the length of the road, I'd estimate that they were moving at 25-30mph, which while not spectacularly fast, still meant a fair amount of focus adjustment to track with each vehicle. And as an added bonus, the speed wasn't constant either -- there was first acceleration towards me while I was trying to achieve a focus lock, followed by deceleration for the corner. (And I panned to follow each car through the start of the turn.)
 |
Straight away, I hit two problems. One I should have expected -- that frustratingly easy-to-bump exposure compensation dial. The other I wasn't expecting -- a significant viewfinder lag that made framing difficult. This could've been a great shot, but I cut the car off just slightly due to the lag. |
Straight away, I hit my old "friend", the Fuji X-T1's easily-bumped exposure compensation dial. Reviewing my first few shots, I accidentally dialed in +2/3EV exp. comp. -- not enough to immediately notice through the viewfinder, but enough to clip the highlights under dappled sunlight through trees, since I was shooting JPEG-only at the time.
Fortunately, I caught the problem after a few cars, but it was a bit of a shame to lose these images, especially since one of the prettiest cars at the show was amongst them.
Another unwelcome surprise in those first few shots was the X-T1's viewfinder lag. I've praised it in my earlier shooter's reports, and for ordinary shooting it's exceptionally fast-reacting, by electronic viewfinder standards. When shooting bursts in Continuous High drive mode, though, it's much more bothersome.
I think what's actually happening is that the X-T1 isn't showing the live image between frames at all, just a review of the last image shot. It's something we've seen and commented on with other cameras before, but I must admit given the X-T1's otherwise-swift viewfinder, I wasn't expecting to see it here.
 |
Although the viewfinder lag during burst shooting means it wouldn't be the ideal sports camera, the Fuji X-T1 did a reasonably good job of keeping up with these cars head-on at around 30mph. |
To try and quantify the scale of the problem, I used another camera to film a video showing both the X-T1's live view feed and a flashlight positioned so that it was visible to both cameras. Then I stepped through the video (shot at 60 frames per second) and compared when the camera filming the video first showed light from the flashlight, and when it appeared in the X-T1's live view.
When simply framing with the X-T1 but not shooting, there was precisely one frame of 60p video between the flashlight switching on or off, and the live view feed showing it happen. During Continuous High shooting, though, the delay soared to a full 10 frames of 60p video, or around 1/6th of a second.
That lag made it quite tricky to frame accurately with the X-T1 in burst shooting. What my eye was seeing lagged what my hands were doing -- and with a fairly powerful telephoto, even the slightest twitch of my hands made a significant change to the scene. The result, initially, was that I'd overshoot my intended framing adjustment, then once I realized I'd done so a sixth of a second later, I'd overshoot a correction in the opposite direction. I felt more like I was chasing my subjects than framing them.
It reminded me of another situation with a Fujifilm connection, from a decade and change ago. At a trade show in Las Vegas, NV, Fuji were kind enough to invite me on their blimp, and (this being a pre-9/11 world) the pilot invited me to take the controls for a little while -- with close supervision, of course. Shooting with the Fuji X-T1 reminded me of flying that blimp, and of the pilot's advice on correcting my initially-rather-erratic course.
 |
After a little while, I got used to the lag and learned to think ahead of the camera. With that experience under my belt, I could frame tightly as I wanted, but it did take some practice. |
Blimps take a while to respond to control movements, and so in my brief flight time, I had to learn to overcome the urge to respond to what I was feeling happen, and think ahead of the craft. I had to do much the same with the X-T1 -- think ahead, and fight the urge to respond to what I was seeing in the viewfinder.
While I'd have been happier zooming and panning to follow these moving cars with a DSLR that showed the real scene between frames, it was possible to learn to work with the lag, and to get at least reasonably close to the framing I was going for. That is, until the cars were well into the corner, just 30 feet or so in front of me, and I had to pan sideways very quickly. At that point all bets were off, but by then it was also too tough a challenge for the autofocus system most of the time anyway.
Which brings me nicely back to autofocus -- the very thing I'd originally been intending to test. And how did the X-T1 perform? I'd say the results were fair, but not stunning. Perhaps 20-30% of my shots didn't quite nail focus, but the overwhelming majority were at least close. (And I was pixel peeping here -- printed or viewed full-screen, I'd say nine out of ten images were sharp enough.)
Also, when focus tracking did drift a little astray, it usually returned to a good focus within just a frame or two. Only once in hundreds of frames did it run wild, going extremely far out of focus. That was when I was panning to follow the car I was shooting, which was almost at its closest point, and moving quite quickly relative to the camera. Excluding that one instance, though, focus stayed at least close to the ballpark.
 |
The classics kept rolling and I kept shooting, scoring some really nice results straight out of camera. Fuji's JPEG rendering was just to my taste, more so than Adobe Lightroom and Camera Raw's defaults. |
Another thing I particularly wanted to get a handle on before rendering my verdict on the X-T1 was raw file processing. This is the first X-Trans sensor-based camera which I've fully reviewed, but I'm aware that for quite some time, third-party support for Fuji's unusual X-Trans color filter array was rather less than optimal.
My understanding is that the reasons for this were twofold: one being that supporting X-Trans in the first place required a pretty significant development effort that would only pay off for a relatively small number of photographers, compared to the market for Bayer-filtered cameras. That, coupled with the complexity of demosaicing the X-Trans array -- and the fact that many image processing algorithms used by third-party apps had been developed with Bayer cameras in mind -- meant a lengthy delay for support in the first place, and some image quality issues even once support arrived.
It was my understanding that this had been largely resolved as X-Trans has matured, but really, I wanted to see for myself. As I'm predominantly a Lightroom user, I started there, but I also looked at Photoshop, DxO Optics Pro, and researched the situation with some other key apps.
Using Adobe Photoshop Lightroom 5.4, images from the Fuji X-T1 imported without any fuss at all, and I didn't notice anything untoward in Adobe's rendering of the images. Obviously, Lightroom does render a little differently from the out-of-camera JPEGs. I found that the in-camera profiles -- Provia, Velvia, Astia, Pro. Neg. and Monochrome -- which were recently added by Adobe make things quite a bit closer to their out-of-camera equivalents, though. (And these really are nice to have, if you're a fan of the camera rendering.)
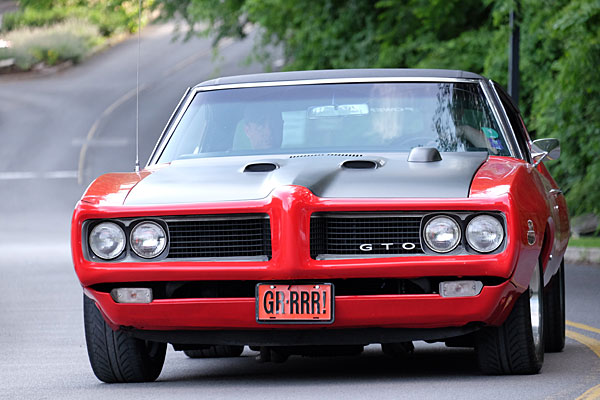
 |
There's something about classic American muscle cars that really gets my pulse racing in a way that modern cars just don't. This 1965 Pontiac GTO is a very nice example of the breed. |
Sadly, these aren't available in Photoshop unless you're a Creative Cloud subscriber. I've so-far resisted upgrading because I haven't seen any feature compelling enough to persuade me to pay an ongoing subscription, so I'm still on Adobe Photoshop CS5. That means I can't open the X-T1's .RAF raw files out of the box -- first they have to be converted with Adobe DNG Converter.
I used version 8.4 to do so, then had a play with the settings, but immediately noticed the absence of any camera profiles except Adobe Standard. Photoshop Camera Raw's rendering of the images was otherwise much like that of Lightroom, which isn't really surprising given that they're based on the same underlying engine.
I had a feeling that DxO Optics Pro wasn't going to touch the X-T1's raw files, as I knew last I'd checked that the French software company hadn't adopted support for X-Trans. Sure enough, that's still the case, and there's no sign of it changing any time soon.
My understanding is that the reason for this is DxO's unique algorithms which so beautifully correct for a wide variety of defects, but are closely tied to the presence of a Bayer CFA. Reworking these for the X-Trans CFA would need a major rewrite, and DxO hasn't yet seen sufficient demand to justify all that work. Nor can Optics Pro handle converted DNGs from the X-T1.
 |
And then... this appeared. I have no idea what this hot rod's lineage is, but it's certainly eyecatching! |
The great shame here, though, is that means X-T1 owners won't have access to DxO's excellent PRIME denoising engine, which in my opinion is the best in town at the moment, albeit a bit slow because it works by throwing vast amounts of processor power at the problem.
I was pleased to find that the other main players -- Apple's Aperture and iPhoto, and Phase One's Capture One -- all support the X-T1 in their current releases. I'm personally not a fan of Capture One's interface, and I don't own any Mac hardware, so I didn't give these a spin. It's my understanding that, like Adobe, these competitors also do a fairly good job at this point.
So, it seems that with the sole, sad exception of DxO Optics Pro, third-party support is now up to snuff. That's good news, and it leaves me with only one other feature I wanted to return for another look at: Wi-Fi support. I'd mentioned in a previous Shooter's Report that I used Wi-Fi quite a bit on my trip, but this was with the more basic of Fuji's two available apps, "Fujifilm Photo Receiver".
The Photo Receiver app simply allows transfer of images from camera to phone, with your selections made on the camera. A second app, "Fujifilm Camera Remote", is more comprehensive, providing not only for image download, but also for remote browsing of the camera, geotagging of images, and remote control.
 |
By day's end I got fairly good at framing despite the lag, zooming out and panning to follow cars into the corner with the tight framing I wanted. Here, I believe, an early 70s Pontiac Firebird Formula. |
Although I wasn't a big fan of the app's interface, I did quite like the remote control capability. Range was fairly good -- perhaps 50-60 feet with a wooden floor in between camera and phone seemed about the limit before the live view feed became unusable. (But it reestablished seamlessly, as soon as I moved back a bit closer to the camera.) And lag was relatively short, as well -- perhaps a little more than a tenth of a second. The ability to tap on the live view feed to select a focus point is also nice.
The layout is a bit bizarre, though. There's only a very small window in which to see the live view feed in portrait orientation, and the app won't rotate to landscape orientation. Most of the screen around the live view feed is packed with controls and status displays. I'd have expected tapping on the status displays to provide the option to change exposure variables, but it doesn't.
Instead, a single exposure variable is highlighted beneath the status display -- either aperture or exposure compensation. Left and right arrows select a value, and clicking on the button between lets you select the other variable. Beneath is a Shutter button control, with two buttons on either side. The left button pulls up a shooting menu, and the right button an ISO menu. Yet the very top item for adjustment in the shooting menu is ISO sensitivity, even though it has its own dedicated button.
The shooting menu provides access to options such as film simulation, white balance, macro, flash mode, and self-timer -- but not shutter speed. And it seems there's no way to access this function at all, nor to choose to shoot in Program mode, so you're limited only to Aperture-priority shooting. (And this is with the camera body itself set with all dials in their Auto positions.)
 |
No awards for guessing what car this is! A beautiful mid-60s Ford Mustang in the late afternoon sun... |
There's also a slider which, when touch-dragged, switches between still and movie capture, and a playback button to take you to the image browser. This last is a nice touch, because it allows immediate transfer without having to disconnect from the camera and re-pair. You can select multiple images at a time for transfer, but sadly there's no way to see anything larger than a tiny thumbnail. (And my HTC One X+ phone has a relatively large screen; many phones would should the thumbnails at an even smaller size.)
The Receive option on the main screen of the app provides much the same interface as the standalone Photo Receiver app, so there's really no need to have both apps installed. Browse Camera, meanwhile, provides basically the same interface used for selecting images from the Remote Control mode, again with only tiny thumbnails.
And finally, the Geotagging function piggybacks on your phone's GPS receiver and uses this to determine the capture location of each image. After tapping the geotagging button in the app's main menu, the phone's GPS receiver is enabled and location logged for up to 60 minutes. This I couldn't get to work, even though geotagging was enabled in the camera's menu.
Even if I could, though, I wouldn't really find it useful. My phone already has short-enough battery life without running its GPS receiver for an hour at a time just in case I happen to take a photo -- and I really don't feel like waiting for Wi-Fi to connect so I can start and stop the GPS service ad-infinitum. Geotagging is a feature that belongs in an in-camera GPS receiver or a dedicated GPS accessory, not in my phone.
 |
But be that as it may, the more expansive Wi-Fi app did prove worthwhile, if only for the remote control capability and its mirror of the Photo Receiver app features. I think I'd probably stick with this version simply because, knowing my luck, the one time I uninstalled it I'd find myself out of cellular connectivity and wishing I had the remote control mode available.
And that about does it for my final Fuji X-T1 Shooter's Report. Looking back over my time with the camera, I found plenty to love, and a few things not to like quite so much. Probably key among these are the too-easily-bumped exposure compensation dial, and the hard-to-press rear-panel buttons.
I really did like the size benefit over my DSLR, though, and image quality was pretty good too. And with the aforementioned control quirks aside, there's just something about the X-T1's aesthetic and build that screams "enthusiast camera". The absence of a mode dial -- and presence of auto positions on the other dials -- is incredibly intuitive, and I'm going to miss it when I return to my daily shooter. Warts and all, I found myself reaching for the X-T1 over my other cameras a lot of the time when I went out shooting, and wanted interchangeable lenses.
Earlier in this review, I compared it to another retro-styled camera, the Nikon Df. I think what Fuji has crafted here is an altogether better thought-out shooter than that camera, one in which the retro aesthetic works, rather than gets in the way. Were I in the market for a new interchangeable-lens body -- and willing to switch mounts -- today, the Fuji X-T1 would definitely be on my shortlist.
Fuji X-T1 Review -- Technical Info
by Mike Tomkins
Sensor. At the heart of the Fujifilm X-T1 compact system camera sits the very same 16.3-megapixel, APS-C sized, X-Trans CMOS II image sensor seen previously in the Fuji X-E2. Total resolution is 16.7 megapixels, and the chip has dimensions of 23.6 x 15.6mm.
Compared to a standard CMOS imager with Bayer color filter array, X-Trans chips better resist moiré and false color artifacts, allowing Fujifilm to remove the resolution-robbing optical low-pass filter. The latest-generation X-Trans CMOS II sensors add on-chip phase detection pixels, improving autofocus performance in the process.
An ultrasonic vibration system is included to remove dust from the image sensor.
Processor. Output from the image sensor is handled by Fuji's EXR Processor II, which is also featured in the X-E2.
Performance. Performance of the pairing is, according to Fujifilm, just a little faster than in that camera, however. The Fuji X-T1 is said to be capable of shooting eight full-resolution frames per second with motion-predictive, tracking autofocus, up from 7 fps in the X-E2. In our lab, we found that claim accurate, with speeds of 8.1 to 8.3 fps, depending on file type. (We've not tested the X-E2, though, so can't draw a comparison ourselves.)
Autofocus is also swift, with a manufacturer-rated response time of just 0.08 seconds when using the XF14mm F2.8 R lens in High Performance mode, a figure that's unchanged from the earlier camera. Our in-house testing found a time of 0.14 or 0.15 second, depending on the number of AF points used, but this also includes the time taken to set exposure and white balance.
Shutter lag is manufacturer-rated at 0.05 seconds, which agrees with the 0.051 seconds measured by our lab very nicely, and startup time is said to be 0.5 seconds with the XF27mm F2.8 lens in High Performance mode.
It's worth noting, though, that in this mode the camera isn't truly "starting up", but rather awakening from sleep. Assuming the same timing as in earlier models, the X-T1 will continue to burn through its battery -- albeit at a reduced rate -- for un unspecified length of time after it is switched off. (In earlier cameras, Fuji listed the time as being as long as 24 minutes, but there's no figure provided in the X-T1 user manual.)
If the power-off threshold time is exceeded in High Performance mode, the camera will not continue to drain its battery, but will take a longer time to start up. Fuji doesn't provide a full startup time, but we found the X-T1's power on to first shot time to be 1.4 seconds in our testing, with a pre-press penalty. (That is, if you press the shutter button too soon, it actually takes longer to get the first shot.)
ISO. Although both sensor and processor are unchanged, the Fujifilm X-T1 extracts better high-ISO performance than does the X-E2, according to its maker. This is said to have been achieved thanks to a redesigned circuit board which, presumably, induces less noise during readout.
The result is a sensitivity range of ISO 200 to 6400 equivalents, expandable to encompass everything from ISO 100 to 51,200 equivalents.
There's also an Auto ISO function, and you can specify an upper limit on sensitivity between ISO 400 and 6400 equivalents.
Electronic viewfinder. The huge news about the Fuji X-T1 -- literally -- is its electronic viewfinder.
For one thing, it has the highest magnification seen on any earlier digital camera, besting even the Olympus E-M1. That camera, by way of comparison, has a 0.74x magnification, whereas the Fuji X-T1's finder boasts 0.77x magnification. (The figure is said to be measured with a 50mm-equivalent lens set to infinity at -1 diopters.)
For another, it's not just big but also fast. According to Fujifilm, it has a viewfinder lag of just 0.005 seconds, and while we didn't have the chance to verify that figure in the lab, we can certainly agree that lag is very minimal indeed! (At least, when framing single shots -- lag is actually quite significant for high-speed burst shooting.)
According to Fujifilm, the X-T1 has less than 1/10th the lag of prior models, a feat achieved by displaying the live view feed on the viewfinder at the same time that subsequent pixels are being read from the sensor.
The viewfinder is based around an Organic LED monitor with a resolution of some 2.36 million dots. (That equates to roughly a 1,024 x 768 pixel array, with separate red, green, and blue dots for each pixel.) Angle of view is 38 degrees diagonally, and 31 degrees horizontally.
User interface. To make best advantage of the new electronic viewfinder, Fuji has also reworked its graphical user interface. There are, depending upon how you look at these things, somewhere between three and five operating modes.
In Full mode, the viewfinder shows shooting information above and below the live view image, to avoid distraction when framing. Normal mode shows more shooting information, but some of this is overlaid on the live view image. Dual mode adds a second, smaller display that is zoomed in to show focus peaking highlights or a digital split-image effect at the point of manual focus, helping you get your subject sharp while keeping tabs on framing. And finally, both full and normal modes can rearrange themselves appropriately during portrait framing.
Monitor. Having a great electronic viewfinder is a big deal for DSLR shooters making the leap to mirrorless, but there will always be times when you'll need to use the LCD instead, whether it's shooting from an awkward angle, or just chimping your shots with family and friends.
The Fuji X-T1 has a 3.0-inch LCD monitor with 1.04-million dot resolution, equating to some 720 x 480 pixels with three dots per pixel.
The display is overlaid with tempered glass to help protect from minor knocks and scratches. That's harder and more scratch-resistant than plastic and non-tempered glass, but not as strong as the Gorilla Glass or Sapphire Glass used in a handful of cameras.
Tilting mechanism. The Fuji X-T1's display is articulated, and can tilt upwards or downwards. Fuji doesn't provide a precise spec for either direction, but the range is such that you can tilt the screen upwards a little beyond 90 degrees, and downwards by about 45 degrees. The screen can't be viewed from in front of the camera, though, and nor can it be folded inwards for protection as in some tilt/swivel designs.
Optics. Fuji's X-mount lens lineup is quickly maturing, with quite a generous selection of very nice optics already on offer -- especially if you're a prime shooter -- and much more promised over the next couple of years. 14 lenses are already available, with five more on the roadmap in the next year or two. Among those are eight primes (seven shipping), and nine zooms (five shipping).
The sixth zoom, arriving imminently in July 2014, is particularly interesting, because it's the first weather-sealed optic, important given that this is a weather-sealed body. The XF18-135mm F3.5-5.6 R OIS WR lens will be followed by two more sealed optics, the XF16-55mm F2.8 R OIS WR and the XF50-140mm F2.8 R OIS WR, but we don't have dates for these.
Clearly, these three optics represent the most versatile pairing with the X-T1, but if you don't need weather sealing, you have (or will soon have) around 16 lenses to choose from. And in-camera Lens Modulation Optimizer technology will, says Fuji, maximize each lens’ performance.
Focusing. We've already touched on the Fuji X-T1's autofocus system, but briefly, this is much the same as in the previous X-E2. It's a hybrid system coupling both contrast detection and phase detection, with the latter using information derived from PDAF pixels on the image sensor itself.
Fuji rates the system as capable of a 0.08 second autofocus response time with the XF14mm F2.8 R lens in High Performance mode, and claims it to be the fastest in its market segment. We don't separate autofocus timing from exposure and white balance timing in our own testing, as we don't feel that figure to be significant. Our test counts everything from when the shutter button is pressed until the photo is captured, assuming that the lens is already in focus (in other words, no focus adjustment is needed, but the camera has to take the time to understand that it's already in focus.) With that methodology, we get a time of 0.14 to 0.15 seconds to take a shot, depending on the number of AF points involved.
You can, of course, focus manually too -- and should you choose to do so, Fuji includes both focus peaking and its clever digital split image function to help you get the shot with focus where you want it.
Exposure. Available exposure modes in the Fuji X-T1 include Program, Aperture-priority, Shutter-priority, and Manual. As befits a camera aimed at enthusiasts and experienced photographers, there are no hand-holding scene or Auto modes here.
Metering. Metering modes are selected with a physical dial on the X-T1's top deck, and include 256-zone TTL Multi, Average, and Spot.
Shutter. Shutter speeds range from 1/4,000 to 30 seconds, and are set with a physical dial. They're controlled with a focal plane shutter, and in addition to these speeds, you can also opt for Time or Bulb exposures, with the latter confined to a one-hour exposure or less.
X-sync is at 1/180 second or slower.
Flash. The Fuji X-T1 doesn't include a built-in flash, but again, that's not surprising given the target market. (And nor is there really space for one.)
What it does feature is a hot shoe and sync terminal, and an included EF-X8 flash strobe sits in that hot shoe. It has a guide number of 8 meters at ISO 100.
Flash modes include Auto, On, Off, Slow-sync (first / second curtain), and commander. A red-eye reduction function is available.
Creative. Among the X-T1's creative options are an interval timer function, a selection of ten film simulation modes that recreate the look of various Fujifilm and generic film types on JPEG images, eight different digital filters, and a dynamic range control. You can also process raw images in-camera.
The interval timer function allows intervals between one second and 24 hours, and has a maximum limit of 999 frames.
Movies. The Fuji X-T1 can shoot Full HD 1080p (1920x1080) or HD 720p (1280x720) movies, both at frame rates of 60fps or 30fps using H.264 video compression with linear PCM stereo audio in a MOV container. To maximize creative expression, Fujifilm's classic film simulation settings can be applied during movie recording, and so can exposure compensation of ±2 EV.
Wireless networking. Fujifilm has included 802.11b/g/n Wi-Fi wireless networking connectivity in the X-T1 compact system camera, and this allows remote live view and control from a compatible smartphone or tablet using the Fujifilm Camera Remote app.
The updated Wi-Fi functionality will now allow remote capture and settings control for most functions, including exposure (compensation, aperture, ISO sensitivity, but sadly not shutter speed), white balance, flash mode, macro, and self-timer functions.
You can also transfer images to your smartphone or tablet, automatically save them to your PC, and piggyback off your phone's GPS to geotag images with their capture location. (The latter will, however, drain your phone's battery life.)
Connectivity. Fujifilm has also included several wired connectivity options in the X-T1 camera body. These include a Micro USB 2.0 High Speed data connection (also compatible with the optional RR-90 remote release cable), a Type-C Mini HDMI connector, and a 2.5mm stereo microphone jack. The latter also acts as a shutter release input.
Storage. An interesting first for the Fuji X-T1 is that it supports the latest UHS-II Secure Digital cards, which offer even higher transfer rates than the existing UHS-I high-speed cards. According to Fuji, no previous compact system camera has included UHS-II support.
Fuji says transfer rates with UHS-II cards are approximately double those of conventional cards, and allow the X-T1 to review images simultaneously with writing the buffer memory to flash, so you don't have to hang around waiting to see your shots. In our own testing, we found an improvement in speed of about 30% over our fastest UHS-I card, but we only had access to a single UHS-II card, and so it's possible a different card might have shown a greater advantage.
Of course, higher-capacity SDHC and SDXC cards are also supported.
Power. The Fuji X-T1 draws power from an NP-W126 lithium-ion rechargeable battery, said to be good for 350 shots on a charge.
If you need longer -- or want better ergonomics for portrait-orientation shooting -- then an optional VG-XT1 vertical battery grip should be on your wishlist. With this installed, you'll be able to shoot 700 shots before needing to change batteries. Importantly, the grip is weather-sealed to the same standard as the X-T1 camera body.
Accessories. A variety of other accessories are offered for the Fuji X-T1 camera. These include three non-powered MHG-XT hand grips in different sizes, a grip strap, a dedicated all-leather BLC-XT1 case, a CP-W126 DC coupler, an AC-9V AC adapter, an MIC-ST1 stereo microphone, an extended eyecup, and a variety of flash strobes, filters, and adapters.
Place your order with a trusted Imaging Resource affiliate now:
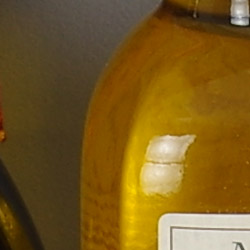
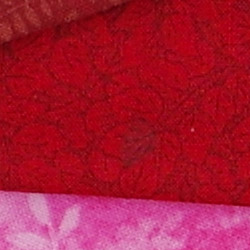
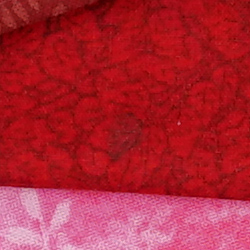
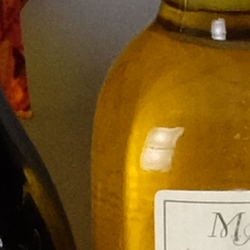
Fuji X-T1 Image Quality Comparison
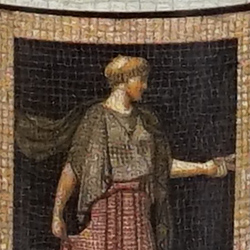
Below are crops from our laboratory Still Life target comparing the Fuji X-T1 with the Canon 70D, Fuji X-E2, Nikon D7100, Pentax K-3 and Sony A7. These models all have current U.S. street price points between $1550 and $2000, and all models are APS-C except for the full frame Sony A7, which we included for a comparison between sensor sizes. These comparisons were somewhat tricky to write, as the cameras vary a great deal in resolution, so bear that in mind as you're reading and drawing your own conclusions. (We generally try to match cameras in these comparisons based on price, given that most of us work to a budget, rather than setting out to buy a given number of megapixels.)
NOTE: These images are best quality JPEGs straight out of the camera, at default settings including noise reduction and using the camera's actual base ISO (not extended ISO settings). All cameras in this comparison were shot with our very sharp reference lenses. Clicking any crop will take you to a carrier page where you can click once again to access the full resolution image as delivered straight from the camera. For those interested in working with the RAW files involved, we've put links beneath each crop set that will take you to the RAW file. You can access the full set of RAW images we shot via the Fuji X-T1's Thumbnails page -- links to the RAW files appear beneath those for the JPEG images, wherever we have them. And remember, you can always go to our world renowned Comparometer to compare the Fuji X-T1 to any camera we've ever tested.
Fuji X-T1 versus Canon 70D at base ISO
 |
 |
 |
 |
 |
 |
The Canon 70D has roughly four megapixels greater resolution than the X-T1 and is also currently the most affordable of the bunch other than the X-E2. Even though the resolution is different, each appear to have similar sharpness and detail in the first two crops, but the fabric comparisons are interesting. The 70D clearly out-resolves the X-T1 in the pink fabric swatch, and while the red fabric shows more contrast, the X-T1 actually renders the red fabric closer to the way that it appears to the eye. In the first two crops, it's also interesting to note that the 70D is applying a good bit more sharpening than the X-T1 does (note the slight halos around the printed lines in the top crops). This has the effect of significantly increasing the contrast in the details of the figure's robe in the second set of crops, but it's artificial, not representing actual subject detail. |
|
Fuji X-T1 versus Fuji X-E2 at base ISO
|
 |
|
 |
|
 |
As expected, these two 16-megapixel cameras from Fuji appear virtually identical here, although the X-T1 seems to pull just a bit more detail out of the red fabric. |
|
Fuji X-T1 versus Nikon D7100 at base ISO
|
 |
|
 |
|
 |
At 24 megapixels, the D7100 is roughly eight megapixels greater in resolution, and the images look so much larger that it's tough making accurate comparisons at base ISO. The mosaic tile image in the D7100 looks quite good, and it certainly does a good job resolving the fabric swatches as well. The X-T1 is perhaps still a bit more natural in the red fabric (reality is somewhere between the two), but loses much detail in the pink swatch. Overall, we have to give the nod to the higher-resolution D7100 here at base ISO. |
|
Fuji X-T1 versus Pentax K-3 at base ISO
|
 |
|
 |
|
 |
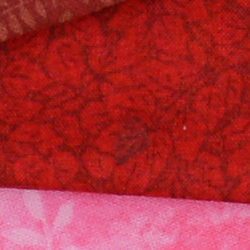
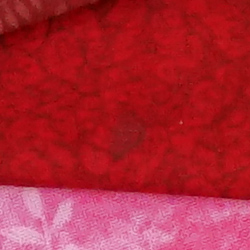
The K-3 clearly dominates the fine detail landscape here, with an even sharper rendering of the mosaic tile than the D7100, and far more detail than the X-T1. The K-3 has 24-megapixel resolution and simply outmatches the X-T1 in most respects. As you'll see with virtually all Pentax cameras, they tend to render the pink fabric swatch as appearing too magenta, but the rendering of the red fabric swatch is the best of all six cameras in this comparison, so there's only that one minor issue with the pink rendering from the K-3. |
|
Fuji X-T1 versus Sony A7 at base ISO
|
 |
|
 |
|
 |
The A7 showcases what you get from a full-frame camera sporting 24-megapixel resolution, and that's a smoking amount of fine detail. You'll seldom see our mosaic tile crop look like this without going to medium format, nor the incredible detail in the pink fabric swatch, which is clearly in a different class than the X-T1 for those areas. It costs a few hundred dollars more, has a more limited lens selection and its relatively weak low pass filter means you may also suffer from moiré in certain instances like the red fabric swatch above, so there are still trade-offs. |
|
Most digital SLRs and CSCs will produce an excellent base ISO shot, so we like to push them and see what they can do compared to other cameras at ISO 1600, 3200, and 6400. Recent advances in sensor technology have made ISO 1600 look a lot more like ISO 100, but there are still cameras whose quality starts to fall apart at this setting. We also choose 1600 because we like to be able to shoot at least at this level when indoors and at night.
Fuji X-T1 versus Canon 70D at ISO 1600
 |
 |
 |
 |
 |
 |
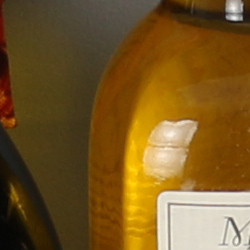
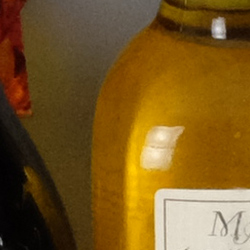
This is where things really get interesting. The X-T1 clearly handles noise better in the shadows behind the top bottle crop, while the 70D has noticeable smudging apparent in the mosaic tiles. A definite nod to the X-T1 on this one. |
|
Fuji X-T1 versus Fuji X-E2 at ISO 1600
|
 |
|
 |
|
 |
Yet again as with base ISO we see virtually identical performance between these two 16-megapixel APS-C cousins. Not much else to report on here, other than a barely perceptible increase in fine detail from the X-T1 in the tiles and fabric areas. |
|
Fuji X-T1 versus Nikon D7100 at ISO 1600
|
 |
|
 |
|
 |
Similar to the 70D comparison, the X-T1 does a better job than the D7100 at controlling noise. The D7100 doesn't smudge the images like the 70D, but certainly begins to lose some critical detail. |
|
Fuji X-T1 versus Pentax K-3 at ISO 1600
|
 |
|
 |
|
 |
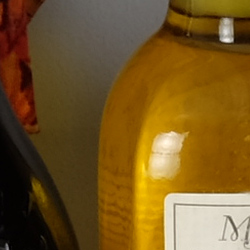
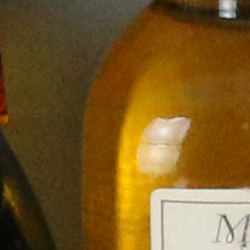
Very interesting here as well, because where the K-3 clearly out-resolved the X-T1 at base ISO, the advantages virtually disappear here at ISO 1600. The X-T1 crops appear even-handed and natural, while the K3 exhibits more noise in the first crop, less sharpness in the tiles crop and loses all contrast detail in our red fabric swatch. |
|
Fuji X-T1 versus Sony A7 at ISO 1600
|
 |
|
 |
|
 |
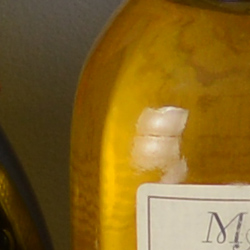
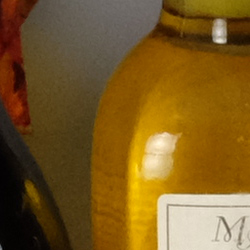
I had to double-check to make sure the A7 crops were actually ISO 1600! Once again, it simply outmatches the X-T1 in virtually all areas, including fine detail, less noise, etc. There is still a trace of moiré in the red fabric swatch, but it won't likely be a factor in the majority of real world images. A stunning performance for ISO 1600. The A7 is of course a full-frame camera, with its much larger sensor area, but it clearly belongs in this comparison, given the relatively small price difference between it and the X-T1. |
|
Today's ISO 3200 is yesterday's ISO 1600, so below are the same crops at ISO 3200.
Fuji X-T1 versus Canon 70D at ISO 3200
 |
 |
 |
 |
 |
 |
Similar to the ISO 1600 comparison, the 70D suffers from more noise in the shadow areas behind the bottle crop and a good deal of smudging artifacts in the mosaic tiles. The fabric swatches have differing issues with each camera, but are roughly a draw. In general, it's advantage: X-T1 here. |
|
Fuji X-T1 versus Fuji X-E2 at ISO 3200
|
 |
|
 |
|
 |
And, once again, virtually identical images between these two as we would expect. |
|
Fuji X-T1 versus Nikon D7100 at ISO 3200
|
 |
|
 |
|
 |
Nikon cameras aimed at the enthusiast market tend to have noise that appears more like film grain as ISO rises than we see with most competing models, and that can sometimes be a good thing. In this case, however, there's just too much of it in comparison to the more even-handed rendering from Fuji. |
|
Fuji X-T1 versus Pentax K-3 at ISO 3200
|
 |
|
 |
|
 |
As with ISO 1600, the X-T1 pulls ahead of the K-3 for overall image quality, as the K-3 has too much noise in certain areas and too little detail in others. Low light shooters comparing these two models will certainly want to take note here. |
|
Fuji X-T1 versus Sony A7 at ISO 3200
|
 |
|
 |
|
 |
We finally begin to see noise processing artifacts in the A7 here, which were virtually nonexistent at ISO 1600, but they're not bad at all. These are at default JPEG noise reduction and sharpening settings, so your output shooting in RAW will certainly vary, depending on the RAW converter you use, and the choices you make for noise reduction and sharpening. Either way, as you'd expect from a full-frame sensor, the A7 appears far superior as a high-ISO performer than the X-T1 in most regards. |
|
Detail: Fuji X-T1 versus Canon 70D, Fuji X-E2, Nikon D7100, Pentax K-3 and Sony A7.
 |
 |
 |
 |
 |
 |
 |
 |
 |
 |
 |
 |
 |
 |
 |
 |
 |
 |
| Fuji X-T1 ISO 200 ISO 3200 ISO 6400 |
Canon 70D ISO 100 ISO 3200 ISO 6400 |
Fuji X-E2 ISO 200 ISO 3200 ISO 6400 |
Nikon D7100 ISO 100 ISO 3200 ISO 6400 |
Pentax K-3 ISO 100 ISO 3200 ISO 6400 |
Sony A7 ISO 100 ISO 3200 ISO 6400 |
| Detail comparison. At first glance the eye is immediately drawn to the astonishing fine detail performance from the A7. Some may consider this comparison unfair, since it's a full-frame camera with higher resolution than all but two of the others, but the price point is the deciding factor on why we included it here. It only costs about 15% more than the X-T1, so it's in the same ballpark. In comparing the rest, the X-T1 clearly doesn't stand out against this field as a high-contrast fine detail performer, with the 70D and the D7100 out-resolving details in the lettering across the ISO range. The Canon 70D's images get a lot of their "pop" from fairly strong sharpening, which artificially increases the contrast between the dark and light lines in the text, though; the D7100's rendering is the most natural of the sub-frame cameras. | |||||
Fuji X-T1 Review -- Print Quality
Very nice 24 x 36 inch prints at ISO 100/200; a nice 16 x 20 at ISO 1600; and a good 5 x 7 at ISO 12,800.
 ISO 100/200 produces very good, accurate images at 24 x 36 inches with excellent color reproduction. Wall display prints are possible at these settings up to 36 x 48 inches, looking quite good if viewed from the customary several feet away given the size of the print.
ISO 400 prints are still quite good at 24 x 36 inches, with no noticeable softness in the red channel, and wall display prints look good at 30 x 40 inches.
ISO 800 images look great at 16 x 20 inches. Wall display prints are possible up to 24 x 36 inches, which is terrific for this sensitivity on an APS-C camera.
ISO 1600 yields a good 16 x 20 inch print as well. There is the first sign of softness in our target red swatch here but it's not bad at all, and just a hint of luminance noise in flatter areas. Overall, a very good image for ISO 1600.
ISO 3200 prints at 13 x 19 begin to lose detail in our difficult red swatch, but are otherwise quite good with only mild, film-like grain in shadows.
ISO 6400 is where the red swatch and a few other areas, particularly reds, start to become too soft to be called good, even at 11 x 14. 8 x 10's print quite well here though, retaining very good color reproduction.
ISO 12,800 makes a nice 5 x 7 inch print, which is still quite good for this sensitivity.
ISO 25,600/51,200 prints are too soft at any size to be called good and are best avoided except in cases where a noticeable watercolor effect is desired.
The Fujifilm X-T1 performs admirably in the print quality department, as expected. Base sensitivity (ISO 200) and the extended setting of 100 each make very nice prints at 24 x 36 inches, and even larger for wall display purposes. And at ISO 1600, 16 x 20 inches is still a very respectable size. The remaining 1EV step settings all turn in solid performances until the highest two, which are best avoided. But all-in-all, the X-T1 delivers the goods here for sound print quality.
In the Box
The Fuji X-T1 retail box ships with the following items:
- Fuji X-T1 camera body
- Fuji XF18-55mmF2.8-4 R LM OIS lens (not weather sealed) if purchased as a kit
- Front and rear lens caps (if lens included)
- Lens hood (if lens included)
- Body cap
- NP-W126 lithium-ion rechargeable battery pack
- BC-W126 battery charger
- EF-X8 shoe-mounted popup flash
- Hot shoe cover
- Eyepiece cup
- Shoulder strap
- Metal strap clips with leatherette protective covers
- Clip attaching tool
- Battery grip connector cover
- Sync terminal cap
- Instruction manual
- Software CD-ROM with Viewer software, RAW File Converter etc.
Recommended Accessories
- Extra NP-W126 lithium-ion rechargeable battery pack for extended outings
- VG-XT1 vertical battery grip (if you want portrait-orientation controls, and extended battery life with a second pack)
- MHG-XT, MHG-XT Small, or MHG-XT Large Hand Grip if you don't want the extra controls and battery slot. These differ solely in the side of the hand grip.
- GB-001 grip belt if you're concerned about dropping the camera while shooting.
- Large capacity SDHC/SDXC memory cards. Given the high resolution and large file sizes of the X-T1, 32GB is a good tradeoff between cost and capacity. If you plan to capture HD movie clips, shoot image bursts, or shoot in RAW format, look for cards with UHS-I or UHS-II markings. UHS-II cards will be the fastest option.
- M mount adapter (to use Carl Zeiss, Leica, Voigtland and Ricoh M-mount lenses)
- External shoe mount flash (EF-X20, EF-42 or EF-20) or other accessory flash
- CP-W126 DC coupler with AC-9V power adapter
- MIC-ST1 external stereo microphone
- RR90 wired remote release
- EC-XT L eye cup for a deeper, more padded eyepiece cup that better blocks ambient light
- CVR-XT cover kit if you lose your hot shoe, accessory grip or PC sync socket covers
- BLC-XT1 leather case or other camera case
- Medium to large camera bag
Fuji X-T1 Review -- Conclusion
| Pro: | Con: |
|---|---|
|
|
With the Fuji X-T1, Fujifilm has a clear goal in mind. The company wants to persuade DSLR shooters to move to a more compact mirrorless camera, and it's put forth a very strong reason for doing so. Unlike some of its retro rivals, the X-T1 manages to blend old and new very successfully, putting an extremely intuitive control system into a body that's much more compact than the typical enthusiast or professional DSLR. The lenses, too, are less bulky than their mirror-oriented rivals.
Once you pick up the X-T1, you can't help but smile -- almost everything about its physical design simply screams "high-quality photographic device". This doesn't feel like a modern, plasticky camera or a computer with a lens. It feels like something you want your hands on, want to shoot photos with, and just don't want to put down. But perhaps the biggest argument for the Fuji X-T1 is its viewfinder, which has incredibly minimal lag. Bring it to your eye, and you're not faced with the delay that you would with most EVFs. You feel at one with your subject, and that's how a great camera should make you feel.
But that's not to say that the Fuji X-T1 is perfect. While it's great for framing single stills, the viewfinder has quite significant lag when shooting high-speed bursts. It seems, as some cameras do, to simply be showing a slideshow of the photo just taken, and not to be showing the real live view. That's a bit disconcerting and makes it harder to frame, although with subjects that move predictably you can account for it. Tracking autofocus is not quite as responsive and accurate as in a high-end DSLR, either. There are also a couple of quirks to the physical controls: an exposure compensation dial that's too easily bumped, and a four-way controller whose tiny buttons have little feel, and are hard to press with your thumb.
But be that as it may, this is a camera that's just plain fun to shoot with, and it takes some really great photos as well. And perhaps more importantly, since it's less bulky than your DSLR, you're more likely to have it with you when you need it most. At least, if it isn't cold or raining: it's a bit of a shame that while the camera itself is weather-sealed and freezeproof, its lenses aren't. That will, thankfully, change very soon, with the introduction of the first weather-sealed X-series lens in July 2014. Two more sealed optics are already on the roadmap for the following 18 months or so, as well.
If you're the kind of photographer who likes to take on the elements, you may want to pause a little while, or purchase in the knowledge that your options may be limited until Fuji can bring more glass to the table. And sports shooters might want to rent or borrow an X-T1 before putting the money down, so they can see if the autofocus and viewfinder performance will work with their particular sport. For everyone else, though, this deliciously-styled retro camera is an enthusiast's dream, and a clear Dave's Pick! Just remember to check that exposure compensation dial frequently...
Like what you see? Support Imaging Resource and place your order with a trusted Imaging Resource affiliate now:
Follow Imaging-Resource.com on Twitter!
 | Print this Page |
Note: For details, test results, and analysis of the many tests done with this camera, please click on the tabs at the beginning of the review or below.

1 $300 Adorama Gift Certificate
2 $200 Adorama Gift Certificate
3 $100 Adorama Gift Certificate
Follow Imaging Resource